This is the main entry point that allows you to use the SDK.
Introduction
The Capture SDK is targeted to developers who want to use the IDEMIA biometric technologies within their mobile apps.
The main features are:
- Biometric captures
- Biometric coding
- Biometric authentication and identification
- Identity documents reading
Please refer to Release Notes to see the list of improvements and fixed issues.
Prerequisites
Skills Required
The integration tasks shall be done by developers with knowledge of:
- Xcode
- Objective-C/Swift
- SDK is not supporting Swift 6 language mode.
- iOS (min version is 15.0)
- (optional) cocoapods
Resources Required
Integration should be performed on a Mac.
The tools required are:
- Xcode that support iOS 15
- iOS device (simulator is not supported)
Licenses Required
Depending of which declination of the library is used the licenses required are:
-
Biometry + Document:
- MORPHOFACS
- VERIF
- IDENT
- MIMA
- MSC_CORE
- MSC_LIVENESS
-
Biometry:
- MORPHOFACS
- VERIF
- IDENT
- MIMA
- MSC_CORE
- MSC_LIVENESS
-
Document:
- MIMA
- MSC_CORE
Note: To enable the feature for video dump you will need also:
- MSC_DUMP
Sample Project
The sample project is provided along with this documentation.
Getting Started
Components
The SDK is composed of six different components:
- LicenseManager: Object responsible for handling the license.
- FaceCaptureHandler: Handles the capture of the face biometrics through the camera of the device.
- FingerCaptureHandler: Handles the capture of the finger biometrics through the camera of the device.
- BioMatcherHandler: Handles the biometric coding and matching.
- BioStoreDB: Repository to store biometric templates (This component is optional, just in case you don’t want to implement your own database).
- DocumentCaptureHandler: Handles the document reading features (Like reading MRZ documents).
- ImageUtils: Handle the images format conversion, in case the integrator needs to change the image format or import an image.
SDK Variants
The SDK comes in six different variants.
-
Full SDK: It contains all the features of the SDK. Includes components: LicenseManager, FaceCaptureHandler, FingerCaptureHandler, BioMatcherHandler, BioStoreDB, DocumentCaptureHandler, ImageUtils. You can integrate it into your project by specifying it in your Podfile:
pod 'BiometricSDK'. -
Biometry variant: It contains all biometric features including face and finger capture and also biometric coding and matching used for liveness checking. Includes components: LicenseManager, FaceCaptureHandler, FingerCaptureHandler, BioMatcherHandler, BioStoreDB, ImageUtils. You can integrate it into your project by specifying it in your Podfile:
pod 'BiometricSDK-biometry'. -
Document variant: It contains only document capture features. Includes components: LicenseManager, DocumentCaptureHandler, ImageUtils. You can integrate it into your project by specifying it in your Podfile:
pod 'BiometricSDK-document'. -
Finger variant: It contains only finger capture features including biometric coding and matching used for finger liveness checking. Includes components: LicenseManager, FingerCaptureHandler, BioMatcherHandler, BioStoreDB, ImageUtils. You can integrate it into your project by specifying it in your Podfile:
pod 'BiometricSDK-finger'. -
Face variant: It contains only face capture features without biometric coding and matching, so for liveness checking you need to use external server. Offline liveness checking is not available. Includes components: LicenseManager, FaceCaptureHandler, BioStoreDB, ImageUtils. You can integrate it into your project by specifying it in your Podfile:
pod 'BiometricSDK-face'. -
Face+document variant: It contains only face capture features without biometric coding and matching, so for liveness checking you need to use external server. Offline liveness checking is not available. Additionally it contains also document capture features. Includes components: LicenseManager, FaceCaptureHandler, BioStoreDB, DocumentCaptureHandler, ImageUtils. You can integrate it into your project by specifying it in your Podfile:
pod 'BiometricSDK-face_document'.
Analytics
Capture SDK offers a logging mechanism that collects analytics data about SDK usage and sends this data to IDEMIA's server in the EU. This data helps IDEMIA to improve Capture SDK and the likelihood of integrator success within the app. It is strongly recommended to use the analytics mechanism.
- Sending analytics data is enabled by default.
- You can enable or disable sending analytics data.
- You can choose to send analytics data only when you are connected to a Wi-Fi network, so as not to not use your cellular connection.
- Analytics data that IDEMIA collects contains only technical data.
- No sensitive personal data is collected.
- IDEMIA does not collect any images.
Analytics data that we collect include following information:
- Application name, bundle id, version
- Capture SDK and RemoteLogger libraries versions
- Capture SDK plugins versions
- Device model and operating system version
- Technical information about performed face, finger, and document capture (such as: used capture mode; timestamp; reason of error; time needed to perform a capture; quality of captured image; and light condition)
- Technical information about performed authentication and identification events (such as: used threshold, duration, and obtained score)
- Other technical information (such as: image compression, occurred errors, and SDK performance) that does not contain personal data
You can disable analytics reporting using the appropriate SDK method.
Analytics are enabled by default and data is sent through Wi-Fi and cellular connections to IDEMIA's server in Europe. You can switch to the server in US by calling:
Objective-C1[[BIORemoteLogger sharedInstance] setConfiguration:[BIORemoteLoggerConfiguration defaultUS]];
You can switch to Wi-Fi only mode with:
Objective-C1[BIORemoteLogger sharedInstance].wifiOnly = YES;
You can disable analytics as with:
Objective-C1[BIORemoteLogger sharedInstance].loggerDisabled = YES;
You should perform above calls before using the SDK, for example, in your app delegate.
Project Configuration
Before using our SDK you need to add Privacy - Camera Usage Description (NSCameraUsageDescriptionkey) to the Info.plist of your application as it will need to use the camera.
Adding the Biometric Capture SDK Framework
We serve our artifacts with the artifactory. As an integrator you can choose one the methods of adding our framework to your project:
- using CocoaPods
- manually
Use CocoaPods (along with cocoapods-artplugin)
If you don't already have the CocoaPods with the Artifactory tool, install it by running the following command:
Bash1gem install cocoapods-art
- The plugin uses authentication as specified in a standard .netrc file.
Swift1machine mi-artifactory.otlabs.fr2login ##USERNAME##3password ##PASSWORD##
- Once set, add our repo to your CocoaPod's dependency management system:
Bash1pod repo-art add smartsdk "https://mi-artifactory.otlabs.fr/artifactory/api/pods/smartsdk-ios-local"
- At the top of your project
Podfileadd:
Ruby1plugin 'cocoapods-art', :sources => [2 'master', # so it could resolve dependencies from master repo (the main one), for newer CocoaPods (1.10+) versions it may not be needed anymore3 'smartsdk' # so it could resolve BiometricSDK depdendency4]
- Add the Capture SDK in your
Podfilein one of its pod's version:
Ruby1pod 'BiometricSDK' # Full version of the SDK, contains biometrics & documents features2pod 'BiometricSDK-biometry' # Contains only biometrics (finger+face) features34pod 'BiometricSDK-finger' # Contains only finger features56pod 'BiometricSDK-face' # Contains only face features without internal liveness checking mechanism7pod 'BiometricSDK-document' # Contains only document features8pod 'BiometricSDK-face_document' # Contains only face features without internal liveness checking mechanism & documents features
Above configuration installs iOS frameworks. For XCFramework, 'XCFramework' subspec can be used for face, face_document and document variants. Eg.
Ruby1pod 'BiometricSDK-face_document/XCFramework'
- Then you can use
install:
Bash1pod install
Note: If you are already using our repo, and you cannot resolve some dependency, try to update the specs:
Bash1pod repo-art update smartsdk
Manually
- Download the artifact manually from the artifactory:
SDK variant | SDK link |
|---|---|
| Face+Document+Fingerprint | BiometricSDK-biometry_document.tar.gz |
| Face+Fingerprint | BiometricSDK-biometry.tar.gz |
| Document | BiometricSDK-document.tar.gz |
| Face | BiometricSDK-face.tar.gz |
| Document+Face | BiometricSDK-face_document.tar.gz |
| Fingerprint | BiometricSDK-finger.tar.gz |
| Algorithms | BiometricSDK-algorithms.tar.gz |
| Plugins | BiometricSDK-plugins.tar.gz |
-
In the project editor, select the target to which you want to add a library or framework.
-
Click Build Phases at the top of the project editor.
-
Open the Embedded Binaries.
-
Click the Add button (+).
-
Click the Add Other button below the list.
-
Add the following items:
BiometricSDK.framework- (optionally for face capture)
BiometricSDKFaceCapturePluginNormal.framework(or other face capturing plugin) - (optionally for face capture)
BiometricSDKAlgorithmPlugin_F6_5_LOW70.framework(or other matching algorithm plugin) - (optionally for finger capture new API)
FingerCaptureSDK.framework - (optionally for finger capture new API)
BiometricSDKUIFinger.framework - (optionally for document capture)
BiometricSDKDocumentCapturePluginGlareDetect.xcframework
Note: XCFrameworks are supported with face, face_document and document variants. XCFrameworks are not yet supported with biometry, biometry_document, fingerprint variants.
SDK Size
SDK variant | SDK size |
|---|---|
| Face+Document+Fingerprint (offline liveness + matching) | 52.49 MB |
| Face+Document+Fingerprint (offline liveness) | 44.26 MB |
| Face+Document+Fingerprint (backend) | 40.19 MB |
| Face+Fingerprint (offline liveness + matching) | 34.13 MB |
| Face+Fingerprint (offline liveness) | 25.90 MB |
| Face+Fingerprint (backend) | 21.83 MB |
| Face (offline liveness + matching) | 31.30 MB |
| Face (offline liveness) | 23.07 MB |
| Document | 21.48 MB |
| Face (backend) | 19.00 MB |
| Document+Face (offline liveness + matching) | 49.66 MB |
| Document+Face (offline liveness) | 41.43 MB |
| Document+Face (backend) | 37.36 MB |
| Fingerprint | 07.12 MB |
All sizes are estimated download sizes from App Store on arm64 devices. Note that universal IPA file size containing the SDK might be visibly different in case it's built also for other architectures and/or includes bitcode.
Sizes are total sizes for the whole packages which includes:
- an appropriate SDK variant
- capture plugins
- algorithms plugins
- UIExtension library
- UIExtension's additional resources like tutorials and animations
Different packages variants contains:
- offline liveness + matching: an appropriate SDK, Face Normal plugin, F5_4_LOW75 algorithm, UIExtensions, face capturing tutorials
- offline liveness: SDK, Face Normal plugin, F6_0_IDD80 algorithm, UI
- backend: SDK, Face Lite plugin, no algorithm, UI
License Manager
Remember: A valid license is required before using any feature of the SDK.
To have a valid license:
- Obtain an instance of
LicenseManagerviaprovideLicenseManager()method. - Call
activate()method on it.
Before Starting
Note: If you use the debug LKMS server without a SSL connection, you should add permission for the arbitrary loads in the transport security section in your Info.plist file. But it's highly recommended NOT to set this permission without the reason.
XML1<key>NSAppTransportSecurity</key>2 <dict>3 <key>NSAllowsArbitraryLoads</key>4 <true/>5 </dict>
New license manager
The License manager is the main entry point to use the SDK. You can manage licenses through LicenseManager.
Note: A valid license is required before using any feature of the SDK.
provideLicenseManager
This static method provides an instance of LicenseManager with a predefined LKMS profile. Any interaction with LicenseManager must be executed before starting capture.
Swift1let manager = LicenseManager.provideLicenseManager(profileId: LkmsProfileId, apiKey: LkmsApiKey, serverUrl: lkmsUrl)
Activating license
This method fetches the license if it's not locally stored and activates it. Additionally, in cases where the license has expired, the function retrieves a new license. This process is crucial and must occur each time the application starts.
Callback solution:
Swift1manager.activate { (error: LicenseActivationError) in2 if let error {3 // Failed to fetch or activate the license.4 } else {5 // License fetched and activated with success.6 }7 }
Async solution:
Swift1let result: Result<Void, LicenseActivationError> = await manager.activate()2 switch result {3 case .success:4 // License fetched and activated with success.5 case .failure(let error):6 // Failed to fetch or activate the license.7 }
LicenseActivationError
This is the information about why the license can not be activated.
Attribute | Description |
|---|---|
| type ActivationErrorType | The type of error that occurred during the license activation. |
| message String | The reason for the activation failure. |
ActivationErrorType
Attribute | Description |
|---|---|
profileExpired | The profile has expired, all licenses won’t work anymore. (Contact with support) |
activationCountExceeded | No more licenses can be consumed. (Contact with support) |
authenticationIssue | The credentials and/or profile are wrong. |
connectionIssue | Connection issue. (Check internet connection and server url) |
unknown | Unknown issue. |
New document capture API - (recommended)
Introduction
In order to make integration easier and more intuitive - new API has been delivered. It is based on use cases that are self-explaining which provide specific information depending on given use case. This allows to focus on working with data provided by SDK rather than on SDK configuration. What is more, some use cases allows to capture whole document (front and back sides) in single capture session - camera opens only once.
Integration
Integration with new API is simple and consists of three steps.
1. License activation and camera permission.
In order to use SDK proper license has to be activated. Getting started section shows how to handle license and permissions.
2. Add DocumentCaptureView to the layout.
This will be not only capture preview but also entry point to the SDK.
1@property (weak, nonatomic) IBOutlet DocumentCaptureView *captureView;
This view implements DocumentCapture protocol which might be called to manage capture. It contains three methods: configure(with captureUseCase: CaptureUseCase), start(), stop().
Setting up is described below. Methods start and stop are similar to old API's methods to manage capture.
3. Use Case Creation
To begin the capture process, a specific use case instance must be created.
Each use case has a property that contains a delegate, which is used to handle callback methods.
If your integration requires backend communication, refer to Creating Session
Once three steps are completed, the configure method on DocumentCaptureView can be called, passing the use case instance as a parameter.
The delegate attached to the use case will receive data from the capture.
Creating Session
Session creation should be implemented on the backend side.
As a result of this process, a sessionId is returned.
To create a session, the following API calls must be performed:
To proceed with the ID&V platform/GIPS, follow these steps:
-
Create an Identity
Creating an identity must be done using API keys with the gips-rs ACL. This process should be handled by a dedicated backend on the integrator's side.
Once the identity is created, the rest of the GIPS communication can be managed using the gips-ua ACL.
A good starting point for implementation is the liveness video capture using a native SDK:
-
Submit user consent confirmation
Confirm that the user has consented to perform specific evidence verifications by sending aPOSTrequest to:Language not specified1/gips/v1/identities/{id}/consents -
Start a document session
Send aPOSTrequest to:Language not specified1/gips/v1/identities/{id}/id-documents/live-capture-sessionA sessionId is returned as a result.
For more detailed instructions on session creation, please refer to the ID&V API documentation, steps 1 to 3:
Use cases
Capture settings of DocumentCaptureSDK are done by using proper, predefined configuration designed for specific use case. In this way capture configuration is more intuitive and less confusing.
RemoteUseCase
This use case performs document capture with backend communication in order to allow manual verification of the document captured. In order to provide correct flow, RemoteCaptureDelegate, FeedbackDelegate and sessionInfo must be provided during RemoteUseCase initialization. FeedbackDelegate is mandatory to instruct user to properly place device during capture and also when to flip document if both sides are required for verification. RemoteCaptureDelegate informs about whole flow result and provides images of document captured. These images have to be approved in order to proceed with the process. sessionInfo provides information about document capture session on IDEMIA Identity and Verification service for SDK needs to continue the flow.
RemoteSessionInfo field | Description |
|---|---|
| sessionId String | Live capture session id created with: v1/identities/{identityId}/id-documents/live-capture-session |
| apiKey String | ApiKey for authorization on DocServer. |
| url URL | Url of document server - for example: https://idproofing-api.environment.idemia.io/doc-server/ |
Swift1if let useCase = DocumentCaptureUseCase.useCaseForType(self.useCaseType, sessionInfo: sessionInfo, delegate: self) {2 self.captureView.configure(with: useCase)3 self.captureView.start()4}
BarcodeCaptureUseCase
This is an offline use case with no requirement for backend integration.
BarcodeCaptureUseCase is dedicated to reading various types of barcodes from scanned data.
There is no image capture involved—only raw data from scanned barcodes is processed. It supports scanning various barcode types, including: Aztec, DataMatrix, QRCode, and PDF417.
If you need to extract data from barcodes found on documents, boarding passes, or other sources without requiring the image itself, this is the ideal solution.
Key Features
- Supports multiple barcode types simultaneously
- No image capture required
- Efficient data extraction from scanned barcodes
Barcode Type Filtering
Only the barcode types specified in the configuration will be scanned.
For example, if the use case is configured to read QR codes only, it will not return data from PDF417, AZTEC, or other types.
You can select multiple barcode types to scan.
BarcodeType enum
BarcodeType is an enumeration representing the available barcode types for scanning.
It includes static variable to simplify integration:
all: All supported barcode types
Configuring delegates
To ensure the correct flow, the following delegates can be used:
CaptureStateDelegateBarcodeDelegateBoardingPassDelegate(optional, for boarding pass-specific logic)
Swift1let useCase = BarcodeCaptureUseCase(2 timeout: 10,3 barcodeTypes: .all,4 captureStateDelegate: self,5 barcodeDelegate: self,6 boardingPassDelegate: self7)89captureView?.configure(with: useCase)10captureView?.start()
Delegates
Delegates available for specific use cases within new API for document capture.
RemoteCaptureDelegate
Delegate dedicated to remote use cases. Two methods needs to be implemented to provide correct flow to the user. Remember that all UI operations should be performed on main thread.
-
The method func
captureInfoReceived(images: [CapturedDocumentImage], finalizer: RemoteCaptureFinalizer)is called when a document is captured. It returns a list of images (front, back, or both sides) and aRemoteCaptureFinalizerinstance that controls the next steps in the capture flow.The
RemoteCaptureFinalizerplays a critical role in the remote capture process, offering three key actions:approved(): Approves the captured images and proceeds with sending them to the backend.cancel(): Cancels the entire capture flow, triggering a failure result via thecaptureDidFinishmethod.restart(): Restarts the capture flow, reusing the existing session.
Important: Since methods from
RemoteCaptureFinalizermay be invoked at any time, theDocumentCaptureViewmust remain in memory (i.e., must not be deallocated). -
func captureDidFinish(remoteResult: DocumentCaptureResult)- returns result of remote flow. No other callback will occur after this method. Result might be type of Success or Failure.
Swift1class DocumentCaptureViewController: UIViewController, RemoteCaptureDelegate {2 func captureInfoReceived(images: [DocumentImage], finalizer: RemoteCaptureFinalizer) {3 //Handle captured document4 }56 func captureDidFinish(remoteResult: DocumentCaptureResult) {7 //remoteResult.isSuccess ?8 //true -> Handle success result9 //false -> Handle error (remoteResult.error)10 }11}
FeedbackDelegate
Returns feedback about current capture. Feedback should be displayed to user.
Only one function to implement: captureInfoReceived(feedback: FaceCaptureFeedback), where FaceCaptureFeedback is an enum telling about capture condition like: document is too far/too close to camera. Remember that all UI operations should be performed on main thread.
Swift1class DocumentCaptureViewController: UIViewController, FeedbackDelegate {2 func captureInfoReceived(feedback: FaceCaptureFeedback) {3 //Present feedback to the user4 }5}
CaptureTimeoutDelegate
The function captureDidTimeout(with images: [CapturedDocumentImage]) returns images that did not meet quality criteria before the capture timed out.
Swift1func captureDidTimeout(with images: [CapturedDocumentImage]) {2 // Images captured that did not meet quality criteria before timeout.3}
BoardingPassDelegate
This delegate method is called after a boarding pass has been parsed. It may be invoked multiple times, depending on how many boarding passes the user scans.
Swift1func captureInfoReceived(boardingPass: BoardingPass) {2 // Parsed information from barcode boarding pass.3}
CaptureStateDelegate
Delegate method that is being called after capture is finished.
Swift1func captureDidFinish(result: DocumentCaptureResult) {2 // Result of the capture.3}
BarcodeDelegate
This delegate method is called after a barcode has been read. It may be invoked multiple times, depending on how many barcodes the user scans.
Swift1func captureInfoReceived(rawBarcodeString: String?, rawBarcodeData: Data, barcodeType: BarcodeType) {2 // Raw barcode and type of barcode detected on camera.3}
Quality Indicators
DocumentQualityIndicators are returned when document during the capture doesn't meet quality criterias. It is returned on the callback captureDidFinish(remoteResult: DocumentCaptureResult) as parameter in the DocumentCaptureResult. It is only returned with the callback captureDidTimeout(with images: [CapturedDocumentImage]) in other situation it doesn't happen.
More about quality indicators structure: API reference
Errors
DocumentCaptureError object contains a lot of useful information that helps in handling a failed flow.
Parameter | Description |
|---|---|
| type DocumentFailureType | Type of an error. High level information what goes wrong. Find types description below. |
| code Int | Special code dedicated for particular case. Very helpful in L2, L3 troubleshooting. |
| message String | Message with error description. |
| qualityIndicators DocumentQualityIndicators? | Quality indicators for a failed capture. |
DocumentFailureType
Type | Description |
|---|---|
| timeout | Timeout occured during the flow. |
| connectionIssue | Remote connection issue. |
| authentication | Remote capture authentication issue. |
| invalidSession | Remote session is invalid. |
| badCapture | Document capture failed. |
| canceled | Capture has been cancelled by the end user. |
| invalidLicense | The LKMS license is invalid. |
| unknown | Unknow type of error. Also used as default type for few cases. |
BoardingPassReader
A simple and convenient class for parsing boarding pass data and reading barcodes from local images.
This is a standalone API entry point and does not require the use of DocumentCaptureView.
Creating a Reader Instance
Swift1BoardingPassReader.provideBoardingPassReader()
Reading a Barcode
Reads barcode data from a provided image.
- Parameters:
image: Data— the image containing the barcode. - Returns: A
String?containing the extracted data, ornilif extraction fails. - Note: This is an asynchronous method.
Swift1func readBarcode(image: Data) async throws -> String?
Parsing a Boarding Pass
Parses raw barcode data into a BoardingPass instance.
- Parameters:
barcode: String— the raw string data from the boarding pass barcode. - Returns: A
BoardingPass?object, ornilif parsing fails.
Swift1func parseBoardingPass(barcode: String) -> BoardingPass?
Julian Date Conversion
Converts a Julian date string into a formatted calendar date in YYYYMMDD format.
- Parameters:
julianDate: String - Returns: A
Date?representing the converted date, ornilif conversion fails. - Note: The returned date may correspond to the current year or a specified year within the current decade.
Swift1func fromJulianDate(_ julianDate: String) -> Date?
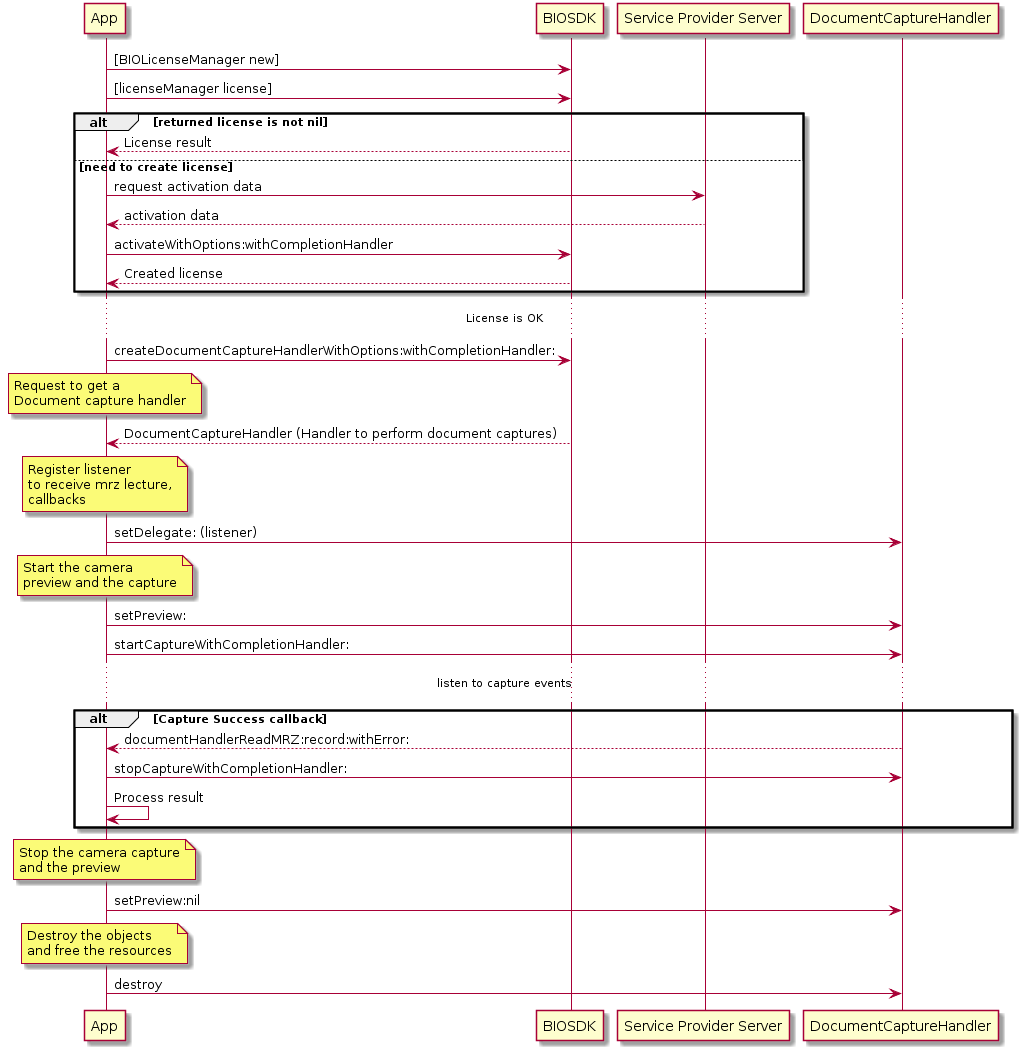
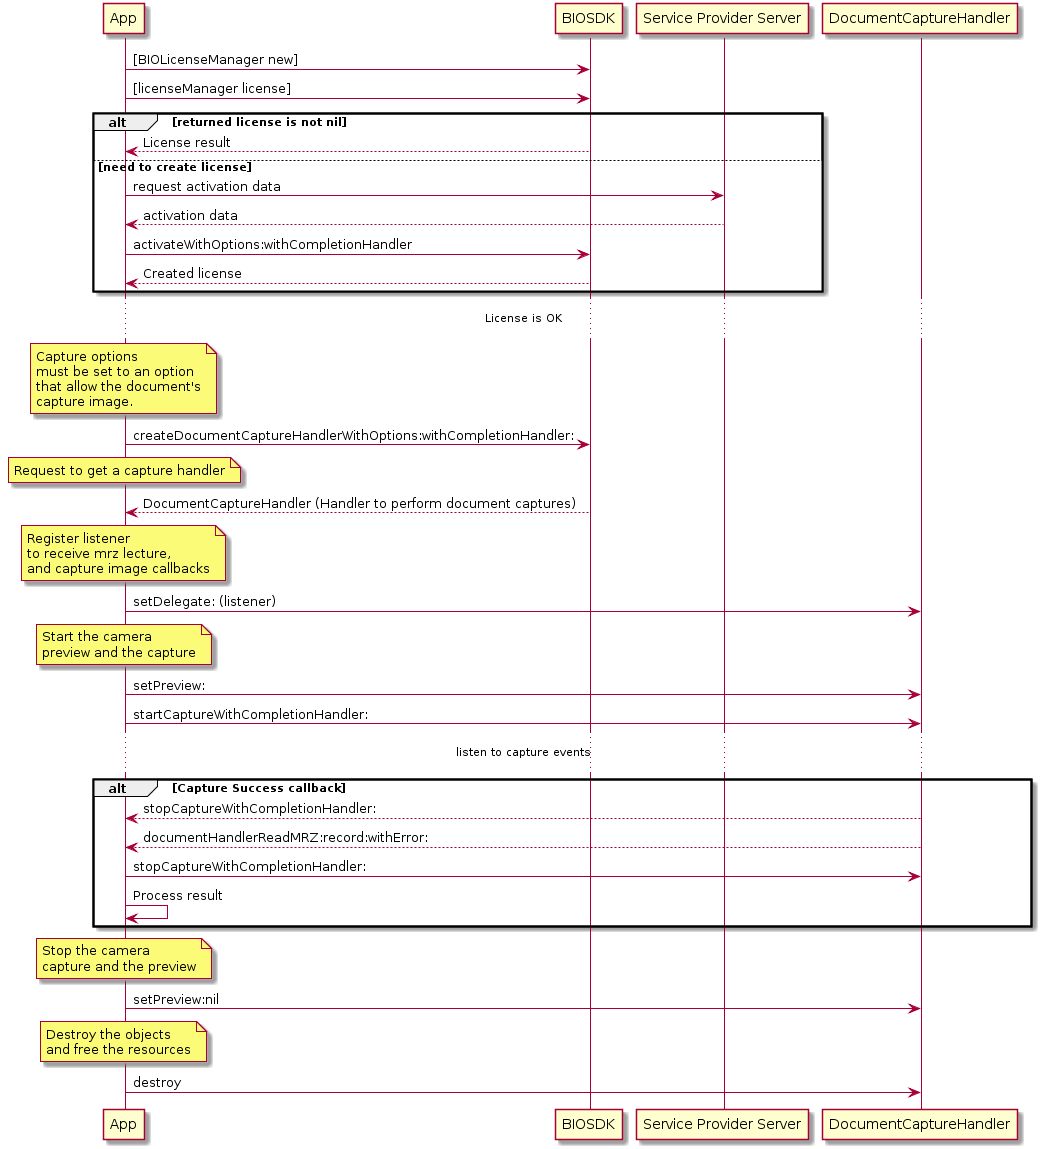
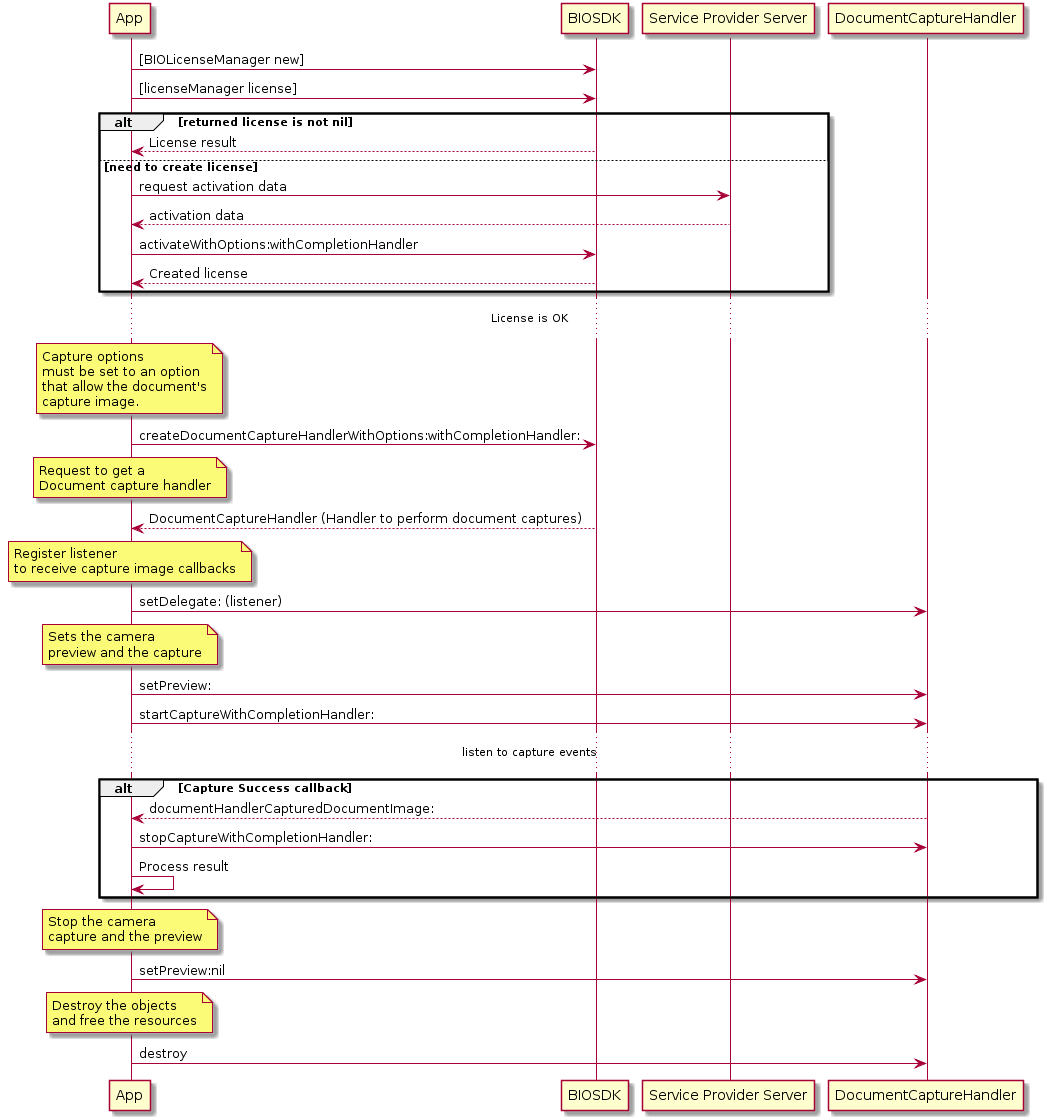
DocumentCaptureHandler
Offline document capture is deprecated. Remote document capture is recommended.
Getting Started with DocumentCaptureHandler
- Import the framework header to your view controller.
Objective-C1#import <BiometricSDK/BiometricSDK.h>
- Add at least one
UIImageViewor subclasses to your layout. It will be used to preview the stream from camera. It is not necessary for the capture to have a preview.
Objective-C1@property (weak, nonatomic) IBOutlet UIImageView *preview;
-
Check your license status here.
-
You also need to have property for
DocumentCaptureHandler. This object is handling all operations related to capturing.
Objective-C1[BIOSDK createDocumentCaptureHandlerWithOptions:options withCompletionHandler:^(id<DocumentCaptureHandler> captureHandler, NSError* error) {2 self.captureHandler = captureHandler;3 ...4 }];
- Set the delegate for
DocumentCaptureHandlertoself.selfwill have to implement theDocumentCaptureHandlerDelegateprotocol.
Objective-C1[BIOSDK createDocumentCaptureHandlerWithOptions:options withCompletionHandler:^(id<DocumentCaptureHandler> captureHandler, NSError* error) {2 self.captureHandler = captureHandler;3 self.captureHandler.delegate = self;4 ...5 }];6 }
- After
DocumentCaptureHandlerfinishes its initialization, the preview view can be set.
Objective-C1[BIOSDK createDocumentCaptureHandlerWithOptions:captureOptions withCompletionHandler:^(id<DocumentCaptureHandler> captureHandler, NSError* error) {2 self.captureHandler = captureHandler;3 self.captureHandler.delegate = self;4 self.captureHandler.preview = self.preview;5 ...6 }];
- Now it can start capturing.
Objective-C1[BIOSDK createDocumentCaptureHandlerWithOptions:options withCompletionHandler:^(id<DocumentCaptureHandler> captureHandler, NSError* error) {2 self.captureHandler = captureHandler;3 self.captureHandler.delegate = self;4 self.captureHandler.preview = self.preview;5 [self.captureHandler startCaptureWithCompletionHandlerError:nil];6 }];
- Whenever the view controller disappears, resources (e.g. camera) need to be released.
Objective-C1- (void)viewDidDisappear:(BOOL)animated{2 [super viewDidDisappear:animated];3 [self.captureHandler destroy];4 }
DocumentCaptureHandler parameters
Delegate
This sets the listener to receive the biometric information.
Objective-C1handler.delegate = ... //Object that implements `DocumentCaptureHandlerDelegate` protocol
Preview
This sets the camera preview.
Objective-C1handler.preview = ..... //An `UIImageView`
Note: To stop the camera preview, set preview to nil.
Debug Settings
This sets the camera preview.
Objective-C1BIODebugDataSettings *settings = [[BIODebugDataSettings alloc] init];2 settings.rtvFilePath = ... //A path to RTV video file used for video playback.3 handler.debugSettings = settings;
Start Capture
This starts the biometric capture.
Objective-C1[handler startCaptureWithCompletionHandler:^(NSError \* error) {2 ...3 }];
Parameter | Description |
|---|---|
| completionHandler void (^)(NSError *) | Object with error code if an error occurred, else nil. |
Stop Capture
This stops the biometric capture.
Objective-C1[handler stopCaptureWithCompletionHandler:^(NSError \* error) {2 ...3 }];
Parameter | Description |
|---|---|
| completionHandler void (^)(NSError *) | Object with error code if an error occurred, else nil. |
Force Capture
There is possibility to force Biometric Capture SDK to capture a document image. To do so, you need to call the method forceCapture during the capture. The component will bypass the tracking and launch the full resolution capture.
Objective-C1// Create and save reference to document capture handler2 //Start capture3 [self.documentCapture forceCapture];
Return | Description |
|---|---|
| NSError | Error with description, if any occurred. |
Switch Camera
This switches between different cameras.
Objective-C1[handler switchCamera:BIOCameraFront withError:&error];2 [handler switchCamera:BIOCameraRear withError:&error];
Parameter | Description |
|---|---|
| camera BIOCamera | Flag that selects the camera. |
| error NSError** | Object with error code if an error occurred, else nil. |
Overlay
This sets the overlay option.
Objective-C1[self setOverlay:BIOOverlayOFF withError:&error];2 [self setOverlay:BIOOverlayON withError:&error];
Parameter | Description |
|---|---|
| overlay BIOOverlay | Flag that determines if an overlay should be on or off. |
| error NSError** | Object with an error code if an error occurred, else nil. |
Orientation
This sets the orientation option.
Objective-C1[self setOrientation:BIOOrientationPortrait withError:&error];2 [self setOrientation:BIOOrientationUpSideDown withError:&error];3 [self setOrientation:BIOOrientationLandscapeLeft withError:&error];4 [self setOrientation:BIOOrientationLandscapeRight withError:&error];
Parameter | Description |
|---|---|
| orientation BIOOrientation | Specifies the orientation of the preview. |
| error NSError** | Object with error code if an error occurred, else nil. |
Options
This retrieves the capture options used in this handler.
Note: Readonly
Objective-C1DocumentCaptureOptions* options = handler.options;
Partial Dump Video
This dumps the last played sequences.
Objective-C1[handler requestPartialDumpVideoWithError:&error];
Note: To dump a partial video, enable partialDumpVideoRecordEnable before starting a capture. This option should be set in the DocumentCaptureOptions that are used when creating the DocumentCaptureHandler.
Parameter | Description |
|---|---|
| error NSError** | Object with error code if an error occurred, else nil. |
Destroy
This releases all the handler resources.
Objective-C1[handler destroy];
Use Cases
Read MRZ
This is an example of reading an MRZ document. This use case is intended to be used when the integrator wants to read the MRZ area of a document like on passports, but without retrieving an image of the document.
NOTE: This mode works only for MRZ with 2 or 3 lines. To capture document with 1 line MRZ please use
MRZ + Document Imagemode described in the next section.
Read MRZ with Document Image
This reads a MRZ document and also captures an image of the document. This use case is intended to be used when the integrator wants to read the MRZ area of a document like on passports, and also retrieve an image of the document.
Capture a Document Image
This captures an image of the document. This use case is intended to be used when the integrator wants to retrieve an image of the document.
Compression Recommendations
Compression specification:
- Resolution of returned image is 4K.
- Recommended compression is JPEG90.
- Size of image will be around 1.5mb
- The compression is compliant with backend services.
To compress an image of type DocumentImage, it is recommended to use the method from the BIOImage extension: .toJPEG(withQuality:). This ensures proper image compression according to the standards set for backend integration.
Swift1func documentHandlerCapturedDocumentImage(_ documentImage: DocumentImage) {2 // Example implementation for compressing DocumentImage using JPEG90 quality3 let compressedImage = documentImage.toJPEG(withQuality: 0.9)4 // Now you can use compressedImage as needed, e.g., uploading it to the backend5 }
DocumentCaptureHandler quality indicator
If the scanned document does not meet the quality criteria, an error will be returned via the callback captureFinishedWithError(_ error: Error?). To determine the issue, you can retrieve the quality indicators from the userInfo dictionary of the NSError object.
Swift1func captureFinishedWithError(_ error: Error?) {2 let nsError = error as NSError?3 if let indicators = nsError?.userInfo["documentImageQualityIndicators"] as? DocumentQualityIndicators {4 // operation with the indicators5 }6 // here you can do operation with error7 }
There is more about indicators in the API reference.
ImageUtils
SDK provides methods to perform various operations on BIOImage such as for example converting BIOImage to various image formats. Those operations are described below.
Compress BIOImage to JPEG
This is the method of the BIOImage class that converts the BIOImage object to NSData object with JPEG file with default compression quality (90% for finger images, 80% for face images, 70% for document images). Created JPEG will contain capture maker note data inside EXIF metadata containing information such as for example SDK version used for capturing the image.
Objective-C1- (NSData *)toJPEG;
Return | Description |
|---|---|
| NSData* | JPEG file binary data. |
Compress BIOImage to JPEG with custom quality
This is the method of the BIOImage class that converts the BIOImage object to NSData object with JPEG file with given compression quality level. Created JPEG will contain capture maker note data inside EXIF metadata containing information such as for example SDK version used for capturing the image.
Objective-C1- (NSData *)toJPEGWithQuality:(CGFloat)quality;
Parameter | Description |
|---|---|
| quality CGFloat | Compression quality in range [0, 1]. |
Return | Description |
|---|---|
| NSData* | JPEG file binary data. |
Get UIImage from BIOImageFromUIImage
This is the method of UIImage (BIOImage) extension that converts a BIOImage to a UIImage.
Objective-C1+ (UIImage*)imageFromBIOImage:(BIOImage*)bioImage
Parameter | Description |
|---|---|
| image BIOImage* | BIOImage to convert to UIImage. |
Return | Description |
|---|---|
| BIOImage* | UIImage from BIOImage. |
Get BIOImage from UIImage
This is the method of the BIOImage (ImageGetters) extension that converts UIImage to BIOImage.
Objective-C1+ (BIOImage*)BIOImageFromUIImage:(UIImage*)image;
Parameter | Description |
|---|---|
| image UIImage* | UIImage to convert to BIOImage. |
Return | Description |
|---|---|
| BIOImage* | BIOImage from UIImage. |
Create a BIOImage with Different Color Space
This is the method of the BIOImage (ImageGetters) extension that converts a BIOImage to another BIOImage with a different color space.
Objective-C1- (BIOImage*)BIOImageWithColorSpace:(BIOColorSpace)colorSpace;
Parameter | Description |
|---|---|
| colorSpace BIOColorSpace | Color space wanted for the new BIOImage. |
Return | Description |
|---|---|
| BIOImage* | BIOImage with the color space provided. |
Compress Image with Quality to NSData
This is a method of BIOImage (BIOResize) extension that compresses an image to a NSData* with determined quality.
Objective-C1- (NSData*)dataByCompressingImageWithQuality:(uint32_t)quality
Parameter | Description |
|---|---|
| quality uint32_t | Quality of the compression (value between 1 and 100). |
Return | Description |
|---|---|
| NSData* | Final data with compression applied. |
Compress Image with Quality to BIOImage
This is the method of the BIOImage (BIOResize) extension to compresses an image to a BIOImage* with determined quality.
Objective-C1- (BIOImage*)imageByCompressingImageWithQuality:(uint32_t)quality
Parameter | Description |
|---|---|
| quality uint32_t | Quality of the compression (value between 1 and 100.) |
Return | Description |
|---|---|
| BIOImage* | Final BIOImage with compression applied. |
Compress Image from Size in Kilobytes to NSData
This is the a method of the BIOImage (BIOResize) extension to compress an image to a NSData* with a determined final size in kilobytes.
Objective-C1- (NSData*)dataByCompressingImageToSizeInKilobytes:(CGFloat)sizeInKilobytes
Parameter | Description |
|---|---|
| sizeInKilobytes CGFloat | Final size in kilobytes. |
Return | Description |
|---|---|
| NSData* | Final data with compression applied. |
Compress Image from Size in Kilobytes to BIOImage
This is a the method of the BIOImage (BIOResize) extension to compress an image to a BIOImage* with a determined final size in kilobytes.
Objective-C1- (BIOImage*)imageByCompressingImageToSizeInKilobytes:(CGFloat)sizeInKilobytes
Parameter | Description |
|---|---|
| sizeInKilobytes CGFloat | Final size in kilobytes. |
Return | Description |
|---|---|
| BIOImage* | Final BIOImage with compression applied. |
Compress Image from WSQ Ratio to NSData
This is the method of the BIOImage(BIOResize) extension to compress an image from WSQ to a NSData* with a determined WSQ ratio. Only fingerprint images should be used in this method.
Objective-C1- (NSData*)dataByCompressingImageToWSQRatio:(CGFloat)ratio withScannerBlack:(Byte)scannerBlack andScannerWhite:(Byte)scannerWhite;
Parameter | Description |
|---|---|
| ratio CGFloat | WSQ ratio for the compression (value between 1.6 and 8000, recommended value between 12 and 15). |
| scannerBlack Byte | Black calibration value (if unknown use 0). |
|scannerWhite Byte | White calibration value (if unknown use 255).
Return | Description |
|---|---|
| NSData* | Final data with compression applied. |
Compress Image from WSQ Ratio to BIOImage
This is the method of the BIOImage (BIOResize) extension that compresses an image to a BIOImage* with a determined WSQ ratio. Only fingerprint images should be used in this method.
Objective-C1- (BIOImage*)imageByCompressingImageToWSQRatio:(CGFloat)ratio withScannerBlack:(Byte)scannerBlack andScannerWhite:(Byte)scannerWhite;
Parameter | Description |
|---|---|
| ratio CGFloat | WSQ ratio for the compression (value between 1.6 and 8000, recommended value between 12 and 15). |
|scannerBlack Byte | Black calibration value (if unknown use 0).
|scannerWhite Byte | White calibration value (if unknown use 255).
Return | Description |
|---|---|
| BIOImage* | Final BIOImage with compression applied. |
Compress Image from JPEG2000 to NSData
This is the method of the BIOImage (BIOResize) extension that compresses and image to a NSData* in JPEG2000 format with a determined maximum size in kilobytes. Only fingerprint images should be used in this method.
Objective-C1- (NSData*)dataByCompressingImageToJPEG2000InKilobytes:(CGFloat)maximumSizeInKilobytes
Parameter | Description |
|---|---|
| maximumSizeInKilobytes CGFloat | Maximum size in kilobytes. |
Return | Description |
|---|---|
| NSData* | Final data with compression applied. |
Compress Image from JPEG2000 to BIOImage
This is the method of the BIOImage (BIOResize) extension that compresses an image to a JPEG2000 in a BIOImage* format with a determined maximum size in kilobytes. Only fingerprint images should be used in this method.
Objective-C1- (BIOImage*)imageByCompressingImageToJPEG2000InKilobytes:(CGFloat)maximumSizeInKilobytes
Parameter | Description |
|---|---|
| maximumSizeInKilobytes CGFloat | Maximum size in kilobytes. |
Return | Description |
|---|---|
| BIOImage* | Final BIOImage with compression applied. |
Crop Image Region (document)
This is the method of the BIOImage (RegionCropping) extension to crop a BIOImage to a determined region.
Objective-C1+ (BIOImage*)cropImage:(BIOImage*)bioImage toRegion:(BIODocumentTrackingInformation*)documentTrackingInfo;
Parameter | Description |
|---|---|
| bioImage BIOImage* | BIOImage to be cropped. |
| documentTrackingInfo BIODocumentTrackingInformation* | Region coordinates that the BIOImage will be cropped to. |
Return | Description |
|---|---|
| BIOImage* | Final BIOImage with the result of the crop, or nil if an error occurred. |
Crop Image Rect
This is the method of the BIOImage (Cropping) extension to crop a BIOImage to a determined rectangle.
Objective-C1- (instancetype _Nullable)cropToRect:(CGRect)rect withMargin:(CGFloat)margin;2- (instancetype _Nullable)cropToRect:(CGRect)rect; // margin = 0
Parameter | Description |
|---|---|
| rect CGRect | Region coordinates that the BIOImage will be cropped to. |
| margin CGFloat | Optional cropping margin |
Return | Description |
|---|---|
| BIOImage* | Final BIOImage with the result of the crop, or nil if an error occurred. |
Crop Image Points
This is the method of the BIOImage (Cropping) extension to crop a BIOImage to a determined rectangle determined by points.
Objective-C1- (instancetype _Nullable)cropToRegionWithPoint1:(CGPoint)point1 point2:(CGPoint)point2 point3: (CGPoint)point3 point4:(CGPoint)point4 withMargin:(CGFloat)margin;2- (instancetype _Nullable)cropToRegionWithPoint1:(CGPoint)point1 point2:(CGPoint)point2 point3: (CGPoint)point3 point4:(CGPoint)point4; // margin = 0
Parameter | Description |
|---|---|
| point1 CGPoint | First point of the region coordinates that the BIOImage will be cropped to. |
| point2 CGPoint | Second point of the region coordinates that the BIOImage will be cropped to. |
| point3 CGPoint | Third point of the region coordinates that the BIOImage will be cropped to. |
| point4 CGPoint | Fourth point of the region coordinates that the BIOImage will be cropped to. |
| margin CGFloat | Optional cropping margin |
Return | Description |
|---|---|
| BIOImage* | Final BIOImage with the result of the crop, or nil if an error occurred. |