Beginner's Guide for Capture SDK
This document is intended for developers, integrators, and architects who aim to build and integrate with the IDEMIA toolkit. It describes the high-level features and components of the SampleApp solution by IDEMIA.
SampleApp is an app provided in source code that includes an integration of the Biometric Capture and Document Capture SDKs. The SDK integration developer can copy and paste the SampleApp code, and adapt it for their context (such as personalizing the splash screen), allowing them to speed up the implementation, and to quickly arrive at a workable app with a well-designed UX.
Note: This guide does not include all the methods for integrating the SDKs. For more detailed information about SDK integration, see the iOS Integration Guide.
Overview
Capture SDK by IDEMIA provides one toolkit for different identity management procedures.
Key features
-
ID capture and Verification - Verifying the customer identity documents (ID) in real time.
-
Identity Verification - Trusting the customer identity.
-
Biometric Authentication - Simple and secure biometric authentication.
Complete Release Notes are available for each release.
Requirements
Product requirements
- Minimum iOS version – iOS 15
- Supported CPU architectures – arm64 (64-bit ARM devices, iPhone and iPad)
- Non Supported CPU architectures – x86_64, armv7, armv7s
- Language support – Swift, Objective-C
Development requirements
- To build a project using the Capture SDK for iOS, you need version 15 or later of Xcode.
- Capture SDK is not supporting Swift 6 language mode. Swift 5 is used.
- Developers with knowledge of Objective-C or Swift
- Configured project in Xcode (turn off BitCode and add Privacy - Camera Usage)
- CocoaPods - optional
Getting started
In this guide we present steps to get started with the Capture SDK framework in your own project.
Prerequisites
-
To build a project using the Capture SDK for iOS, you need version 26 or later of Xcode.
-
Developers with knowledge of Objective-C or Swift
-
Configured project in Xcode (turn off BitCode and add Privacy - Camera Usage)
-
CocoaPods - optional
Download sample applications
Downloadable sample apps are here:
Configuring your project in Xcode
Add the Privacy - Camera Usage Description (NSCameraUsageDescriptionkey) to the Info.plist because the app uses the camera.
Installing the SDK
Use CocoaPods (with Artifactory plugin)
- Add Gemfile to your project, with the following dependencies:
Ruby1gem 'cocoapods'2gem 'cocoapods-art'
Note: We recommend using Bundler to manage your Ruby dependencies, but if you do not have the CocoaPods with the Artifactory plugin installed already, you can also get them with Bundler or Gemfile using these commands in your terminal:
Shell1gem install cocoapods2gem install cocoapods-art
We recommend using Cocoapods 1.13.x or newer and cocoapods-art 1.1.x or newer for the best compatibility.
- The plugin uses authentication as specified in a standard .netrc file. In case you're creating an Artifactory account (your Artifactory credentials can be found in: Dashboard > Identity Proofing > Developer > Artifactory > Secrets > Artifactory), contact the Client IDEMIA department with:
Language not specified1machine mi-artifactory.otlabs.fr2 login ##USERNAME##3 password ##PASSWORD##
- Once set, add our repository to your CocoaPod's dependency management system:
Shell1bundle exec pod repo-art add smartsdk 'https://mi-artifactory.otlabs.fr/artifactory/api/pods/smartsdk-ios-local'
- At the top of your project
Podfileadd:
Ruby1source 'https://cdn.cocoapods.org/'23plugin 'cocoapods-art', :sources => [4 'smartsdk' # so it could resolve Biometric Capture SDK dependency5]
Note: Explicit source is required to correctly resolve Cocoapods' master repository when cocoapods-art plugin is used.
- Add the Capture SDK in your Podfile in one of its pod's version:
Ruby1pod 'BiometricSDK' # Full version of the SDK, contains biometrics & documents features |2pod 'BiometricSDK-biometry' # Contains only biometrics features3pod 'BiometricSDK-document' # Contains only document features
- Then you can use
install:
Shell1bundle exec pod install
Note: If you are already using our repository, and you cannot resolve some dependencies, try to update the specs with:
Shell1bundle exec pod repo-art update smartsdk
Manually
- Download the artifact manually from the artifactory:
SDK variant | SDK link |
|---|---|
| Face+Document+Fingerprint | BiometricSDK-biometry_document.tar.gz |
| Face+Fingerprint | BiometricSDK-biometry.tar.gz |
| Document | BiometricSDK-document.tar.gz |
| Face | BiometricSDK-face.tar.gz |
| Document+Face | BiometricSDK-face_document.tar.gz |
| Fingerprint | BiometricSDK-finger.tar.gz |
| Algorithms | BiometricSDK-algorithms.tar.gz |
| Plugins | BiometricSDK-plugins.tar.gz |
-
In the project editor, select the target to which you want to add a library or framework.
-
Click Build Phases at the top of the project editor.
-
Open Embedded Binaries.
-
Click Add (+).
-
Click Add Other below the list.
-
Add the following items:
BiometricSDK.framework- (optionally for face capture)
BiometricSDKFaceCapturePluginNormal.framework(or other face capturing plugin) - (optionally for face capture)
BiometricSDKAlgorithmPlugin_F6_5_LOW70.framework(or other matching algorithm plugin) - (optionally for finger capture new API)
FingerCaptureSDK.framework - (optionally for finger capture new API)
BiometricSDKUIFinger.framework
Note: XCFrameworks are supported with face, face_document and document variants. XCFrameworks are not yet supported with biometry, biometry_document, fingerprint variants.
Architecture
The SampleApp application consists of independent modules which are reused in particular use cases.
The following figure provides an overview of the ecosystem of the Capture SDK iOS solution. It shows the internal components.
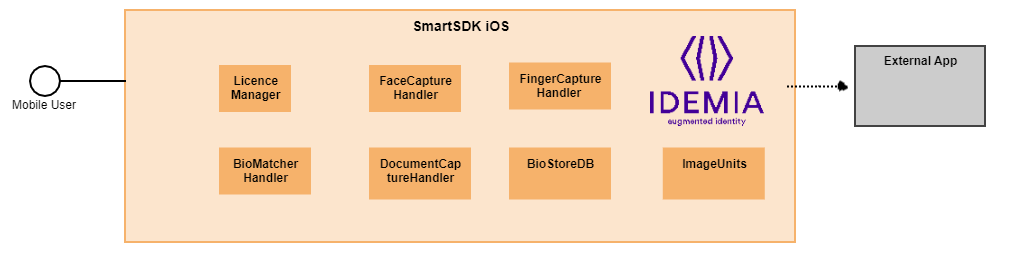
Each one is described in a separate section of this documentation.
-
LicenseManager - Responsible for requesting, storing, and providing the license.
-
FaceCaptureHandler - Responsible for capturing face biometric data.
-
FingerCaptureHandler - Responsible for capturing finger biometric data.
-
BioMatcherHandler - Responsible for biometric coding matching biometric data.
-
DocumentCaptureHandler - Responsible for document scanning functions like reading MRZ documents.
-
BioStoreDB - Responsible for storing all biometric templates.
-
ImageUnits - Responsible for handling the images format conversion.
License Manager
Use Cases
Below is displayed the generic execution flow to be followed to perform the operation when creating or retrieving a valid license.
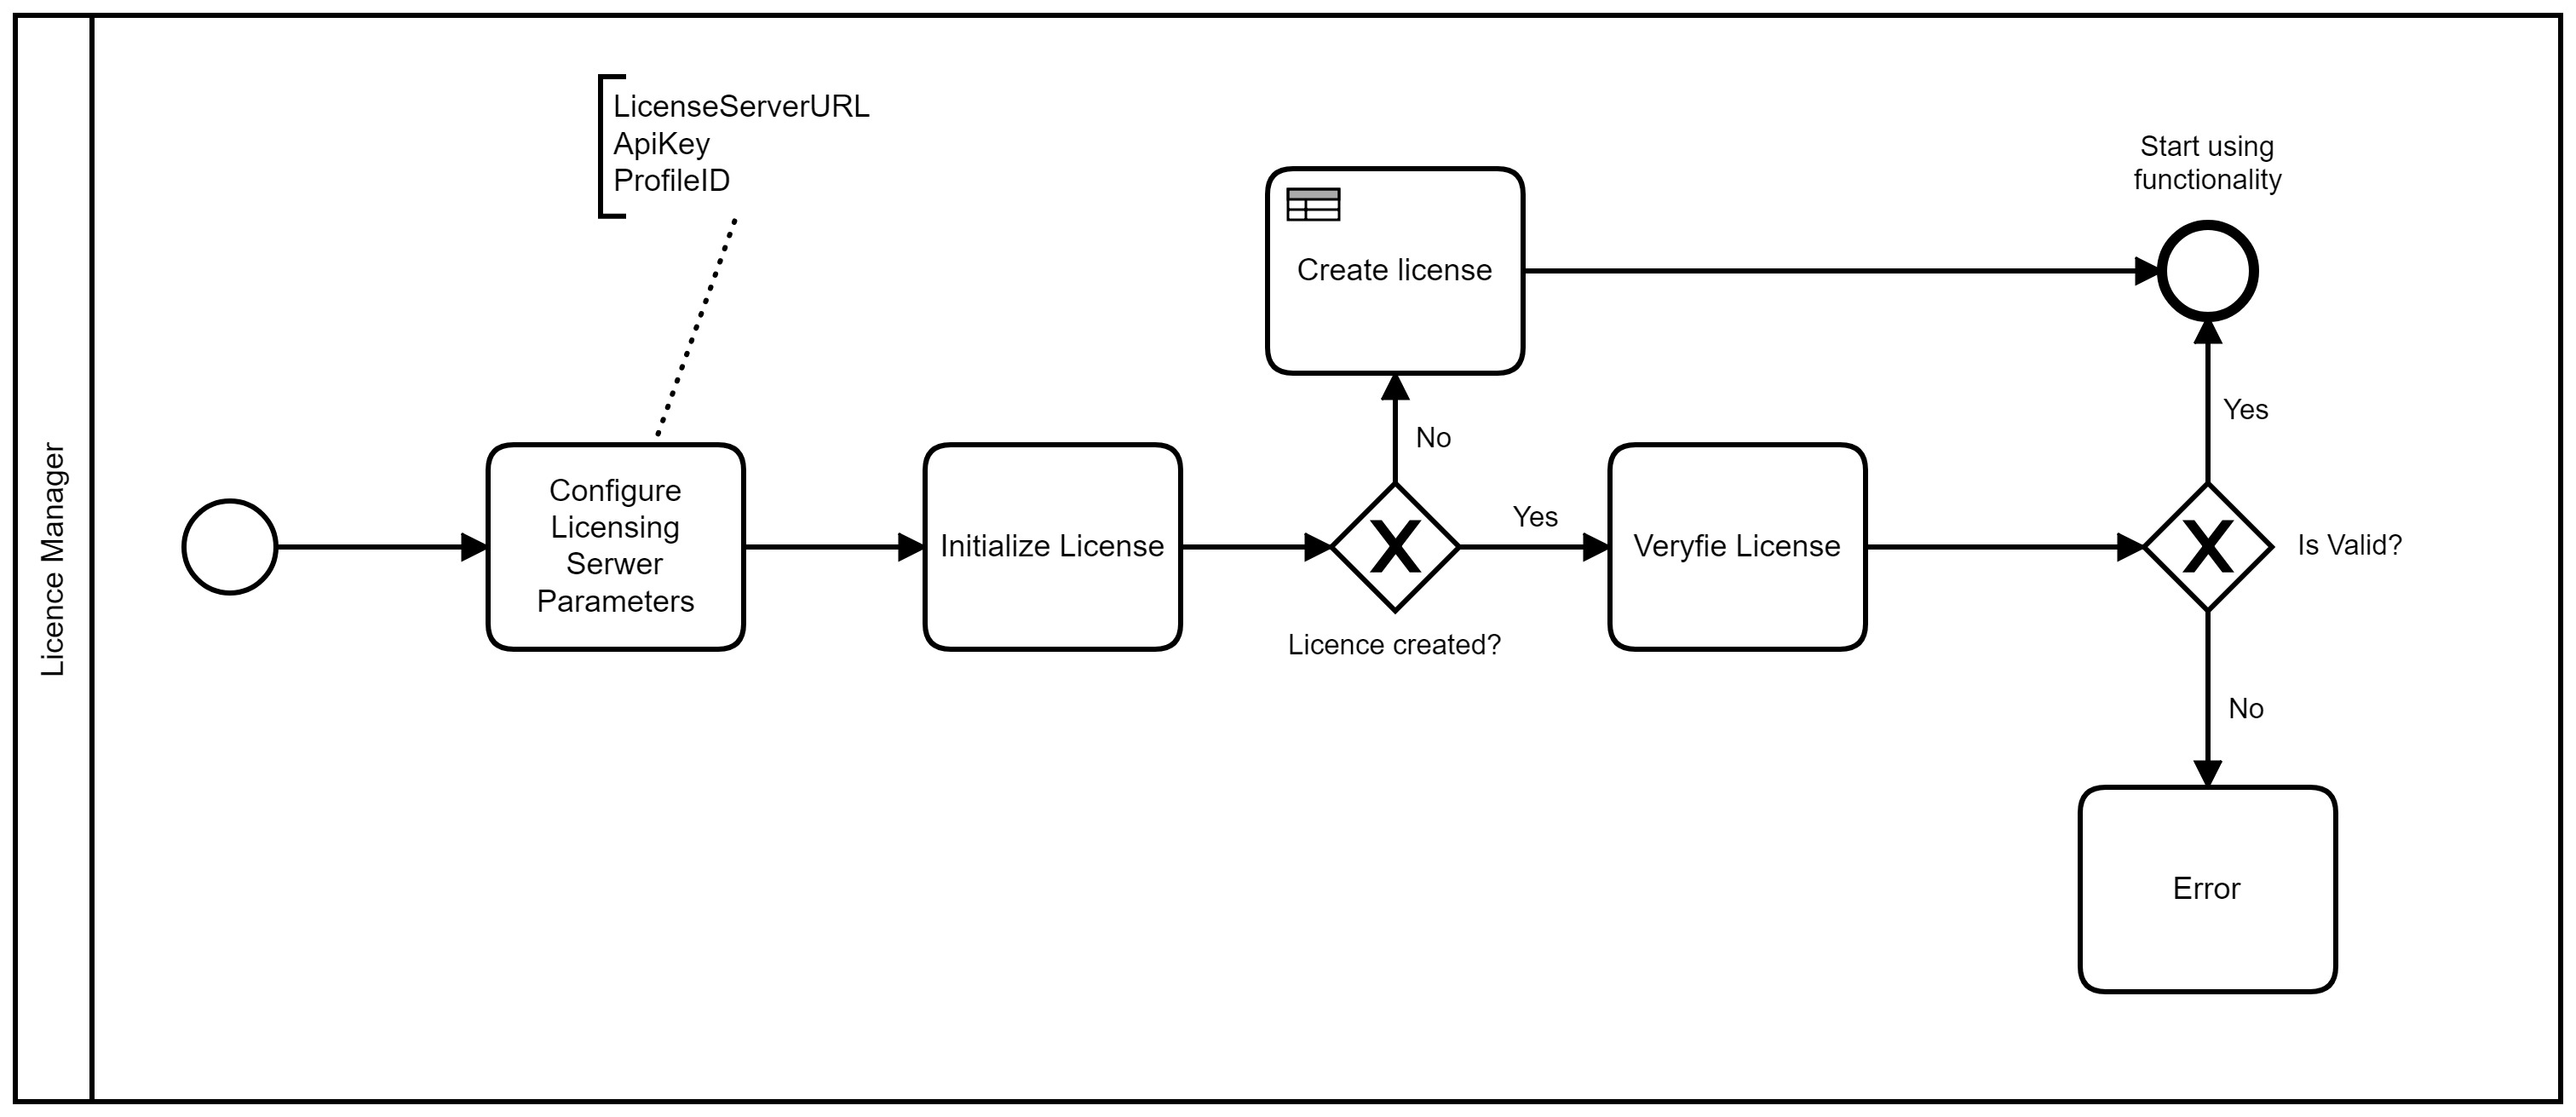
LKMS is the license mechanism supported by the Capture SDK. This is the only licensing that can be used by integrators.
To create a profile for LKMS, the team should provide the following parameters:
-
License Server URL
-
Profile ID
-
API Key
You need to fill the mentioned parameters in LicenseManager.swift which is the main component responsible for retrieving a license.
Open LicenseManager and find LKMS structure.
Code Block 1 LKMS Structure
Swift1struct LKMS {2 static let serverEndpointUrl = "<#LKMSv3 server endpoint URL#>"3 static let profileId = "<#LKMSv3 ProfileID#>"4 static let apiKey = "<#LKMSv3 ApiKey#>"5 }
Licenses Required
Depending on which version of the library is used, the LKMS licenses required are created with features.
Feature | Biometry + Document | Biometry | Document |
|---|---|---|---|
| MORPHOFACS | X | X | |
| VERIF | X | X | |
| IDENT | X | X | |
| MIMA | X | X | X |
| MSC_CORE | X | X | X |
| MSC_LIVENESS | X | X |
To enable the feature for video dump you will need also: MSC_DUMP.
Face Capture Handler
Use Cases
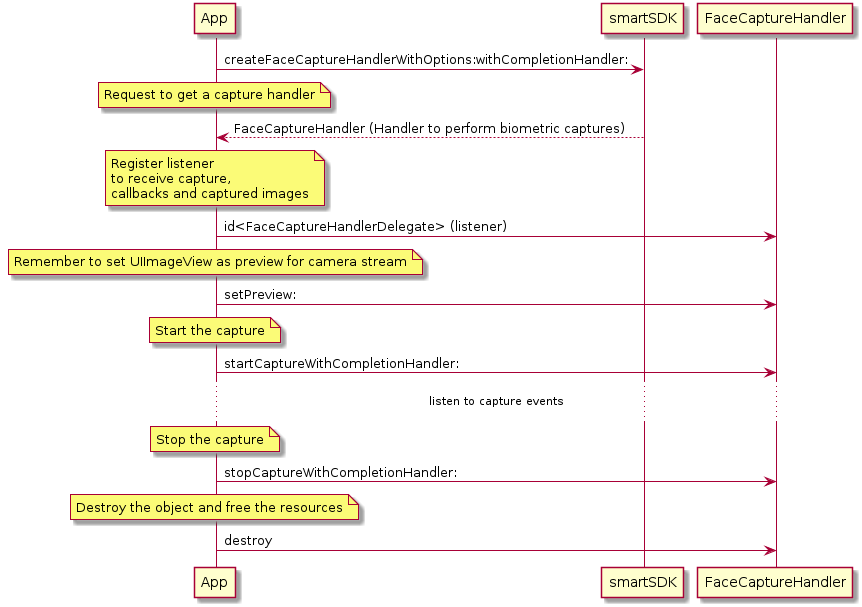
Start Using Face Capture Handler
- Every time before navigating or wanting to use the Capture SDK, make sure there is an active license. The license is checked within the SDK as well, if it's not valid, the SDK will not work.
Swift1let manager = LicenseManager.provideLicenseManager(2 profileId: LKMS.profileId,3 apiKey: LKMS.apiKey,4 serverUrl: LKMS.serverEndpointUrl5 )6 manager.activate { (error: LicenseActivationError) in7 if let error {8 // Failed to fetch or activate the license.9 } else {10 // License fetched and activated with success.11 }12 }
- Import the framework module to your view controller.
1#import <BiometricSDK/BiometricSDK.h>
- Add at least one
UIImageViewor subclass to your layout. It will be used to preview the stream from the camera.
1@property (weak, nonatomic) IBOutlet UIImageView *preview;
- Prepare the property for retaining the
FaceCaptureHandlerinstance. This object will be handling all operations related to capturing.
1@property (strong, nonatomic) id<FaceCaptureHandler> captureHandler;
- Prepare the
FaceCaptureOptionsobject, which contains the capture's configuration. The most important is the liveness mode, which will be used for the capture. More details about the liveness capture modes can be found in the API Reference.
1FaceCaptureOptions *options = [[FaceCaptureOptions alloc] initWithLivenessMode:FaceCaptureLivenessModePassive];
- Create the
FaceCaptureHandlerinstance object using the options and retain the handler by setting it to the earlier prepared property.
1[BIOSDK createFaceCaptureHandlerWithOptions:options withCompletionHandler:^(id<FaceCaptureHandler> captureHandler, NSError* error) {2 if (!captureHandler || error) {3 NSLog(@"Cannot create the capture handler, error: %@", error);4 return;5 }6 self.captureHandler = captureHandler;7 ...8}];
- Set the delegate for
FaceCaptureHandler.delegate.selfhas to implement theFaceCaptureHandlerDelegateprotocol.
1[BIOSDK createFaceCaptureHandlerWithOptions:options withCompletionHandler:^(id<FaceCaptureHandler> captureHandler, NSError* error) {2 if (!captureHandler || error) {3 NSLog(@"Cannot create the capture handler, error: %@", error);4 return;5 }6 self.captureHandler = captureHandler;7 self.captureHandler.delegate = self;8 ...9}];
- After
FaceCaptureHandlerhas finished its initialization, the preview view can be set.
1[BIOSDK createFaceCaptureHandlerWithOptions:options withCompletionHandler:^(id<FaceCaptureHandler> captureHandler, NSError* error) {2 if (!captureHandler || error) {3 NSLog(@"Cannot create the capture handler, error: %@", error);4 return;5 }6 self.captureHandler = captureHandler;7 self.captureHandler.delegate = self;8 self.captureHandler.preview = self.preview;9 ...10}];
- Now it can start capturing.
1[BIOSDK createFaceCaptureHandlerWithOptions:options withCompletionHandler:^(id<FaceCaptureHandler> captureHandler, NSError* error) {2 if (!captureHandler || error) {3 NSLog(@"Cannot create the capture handler, error: %@", error);4 return;5 }6 self.captureHandler = captureHandler;7 self.captureHandler.delegate = self;8 self.captureHandler.preview = self.preview;9 [self.captureHandler startCaptureWithCompletionHandlerError:nil];10}];
- During capturing the SDK will be informing about the events taking place with the delegate's methods:
- Method
receiveBioCaptureInfo:withError:will inform about the capturing status, like a user needs to change a position or an environment is too dark or too light.
1- (void)receiveBioCaptureInfo:(BIOCapturingInfo)info withError:(NSError *)error {2 if (error) {3 return;4 }5 NSLog(@"Received a capturing info: %@", NSStringFromBIOCapturingInfo(info));6}
- Method
captureFinishedWithImages:withBiometrics:withError:indicates that the capture has finished. As a result, an image or an error is returned. The image will contain the best frame with a selfie.
1- (void)captureFinishedWithImages:(NSArray<BIOImage *> *)images withBiometrics:(BIOBiometrics *)biometrics withError:(NSError *)error {2 if (error) {3 NSLog(@"The capture finished with an error: %@", error);4 return;5 }6 NSLog(@"The capture finished successfully.");78 // Converts BIOImage into UIImage9 UIImage *capturedImage = [UIImage imageFromBIOImage:images[0]];1011 // ...12}
- Whenever the view controller disappears, resources (e.g. camera) need to be released.
1- (void)viewDidDisappear:(BOOL)animated {2 [super viewDidDisappear:animated];3 [self.captureHandler destroy];4 self.captureHandler = nil;5}
Finger Capture Handler
Use Cases
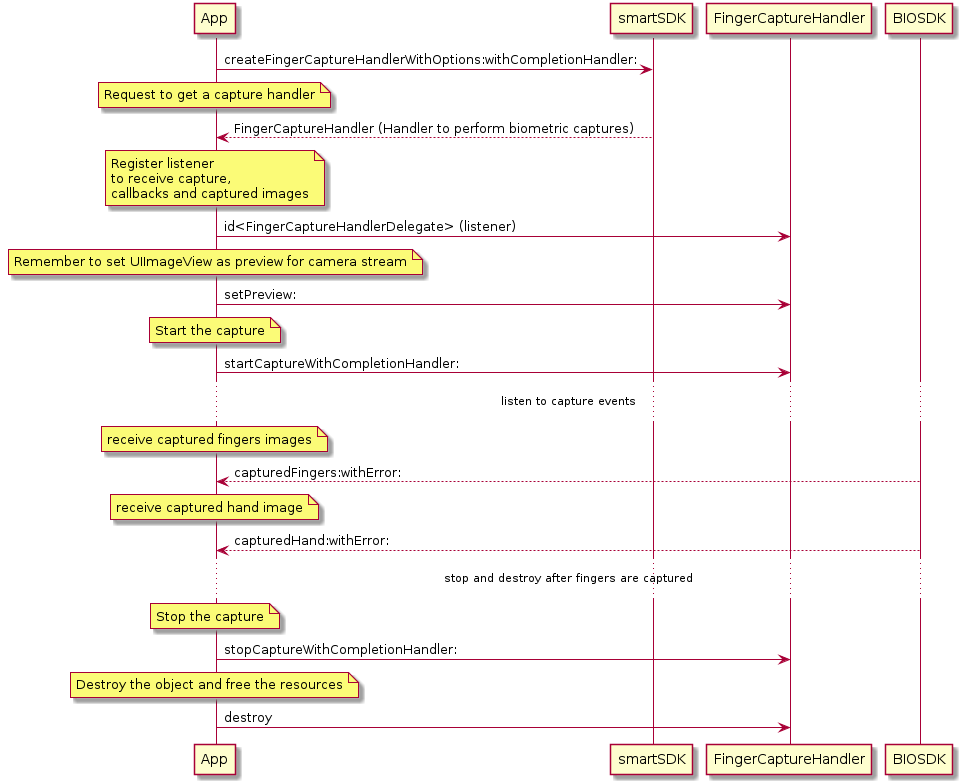
Start Using Finger Capture Handler
- Import the framework header to your view controller.
Swift1#import <BiometricSDK/BiometricSDK.h>
- Add at least one
UIImageViewor subclass to your layout. It will be used to preview the stream from the camera. It is not necessary for capture to have preview.
Swift1@property (weak, nonatomic) IBOutlet UIImageView \*preview;
-
Check your license status.
-
Verify you have the property for
FingerCaptureHandler. This object handles all operations related to capturing.
Swift1[BIOSDK createFingerCaptureHandlerWithOptions:options withCompletionHandler:^(id<FingerCaptureHandler> captureHandler, NSError* error) {2 self.captureHandler = captureHandler;3 ...4 }];
- Set the delegate for
FingerCaptureHandlertoself.selfwill have to implement theFingerCaptureHandlerDelegateprotocol.
Swift1[BIOSDK createFingerCaptureHandlerWithOptions:options withCompletionHandler:^(id<FingerCaptureHandler> captureHandler, NSError* error) {2 self.captureHandler = captureHandler;3 self.captureHandler.delegate = self;4 ...5 }];
- After
FingerCaptureHandlerfinished its initialization, the preview view can be set.
Swift1[BIOSDK createFingerCaptureHandlerWithOptions:options withCompletionHandler:^(id<FingerCaptureHandler> captureHandler, NSError* error) {2 self.captureHandler = captureHandler;3 self.captureHandler.delegate = self;4 self.captureHandler.preview = self.preview;5 ...6 }];
- Now it can start capturing.
Swift1[BIOSDK createFingerCaptureHandlerWithOptions:options withCompletionHandler:^(id<FingerCaptureHandler> captureHandler, NSError* error) {2 self.captureHandler = captureHandler;3 self.captureHandler.delegate = self;4 self.captureHandler.preview = self.preview;5 [self.captureHandler startCaptureWithCompletionHandlerError:nil];6 }];
- Whenever the view controller disappears, resources, such as the camera, must be released.
Swift1- (void)viewDidDisappear:(BOOL)animated{2 [super viewDidDisappear:animated];3 [self.captureHandler destroy];4 }
Document Capture Handler
Use Cases
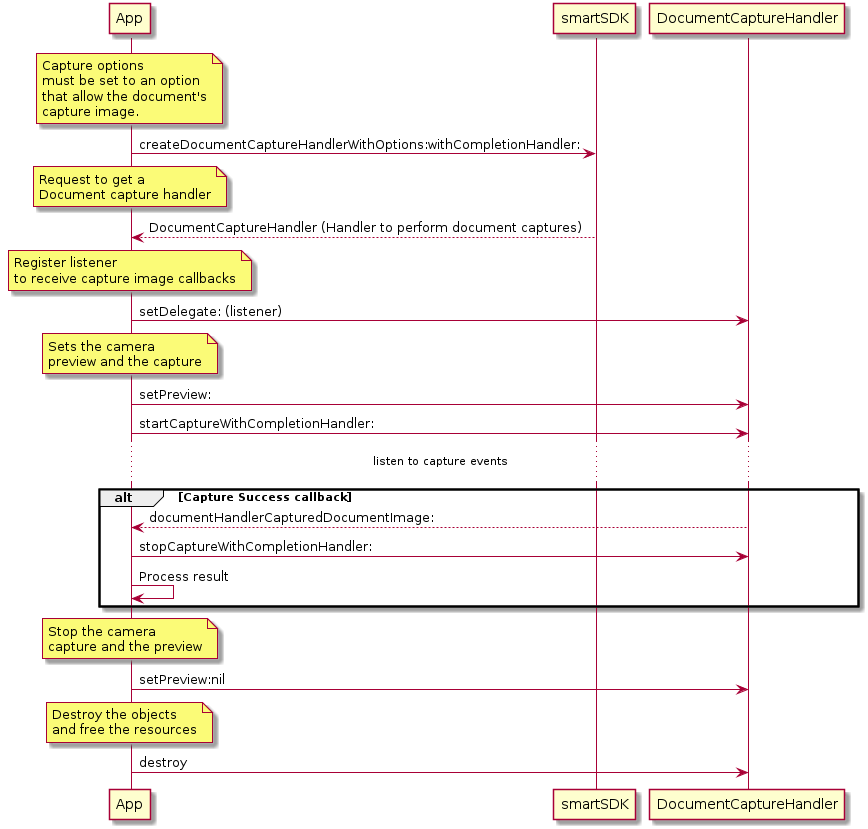
Start Using Document Capture Handler
- Import the framework header to your view controller.
Swift1#import <BiometricSDK/BiometricSDK.h>
- Add at least one
UIImageViewor subclass to your layout. It will be used to preview a stream from camera. It is not necessary for the capture to have a preview.
Swift1@property (weak, nonatomic) IBOutlet UIImageView *preview;
-
Check your license status.
-
Verify that you have the property for
DocumentCaptureHandler. This object handles all operations related to capturing.
Swift1[BIOSDK createDocumentCaptureHandlerWithOptions:options withCompletionHandler:^(id<DocumentCaptureHandler> captureHandler, NSError* error) {2 self.captureHandler = captureHandler;3 ...4 }];
- Set the delegate for
DocumentCaptureHandlertoself.selfwill have to implement theDocumentCaptureHandlerDelegateprotocol.
Swift1[BIOSDK createDocumentCaptureHandlerWithOptions:options withCompletionHandler:^(id<DocumentCaptureHandler> captureHandler, NSError* error) {2 self.captureHandler = captureHandler;3 self.captureHandler.delegate = self;4 ...5 }];6 }
- After the
DocumentCaptureHandlerhas finished its initialization, the preview view can be set.
Swift1[BIOSDK createDocumentCaptureHandlerWithOptions:captureOptions withCompletionHandler:^(id<DocumentCaptureHandler> captureHandler, NSError* error) {2 self.captureHandler = captureHandler;3 self.captureHandler.delegate = self;4 self.captureHandler.preview = self.preview;5 ...6 }];
- Now it can start capturing.
Swift1[BIOSDK createDocumentCaptureHandlerWithOptions:options withCompletionHandler:^(id<DocumentCaptureHandler> captureHandler, NSError* error) {2 self.captureHandler = captureHandler;3 self.captureHandler.delegate = self;4 self.captureHandler.preview = self.preview;5 [self.captureHandler startCaptureWithCompletionHandlerError:nil];6 }];
- Whenever the view controller disappears, resources, such as the camera, must be released.
Swift1- (void)viewDidDisappear:(BOOL)animated{2 [super viewDidDisappear:animated];3 [self.captureHandler destroy];4 }
Bio Match Handler
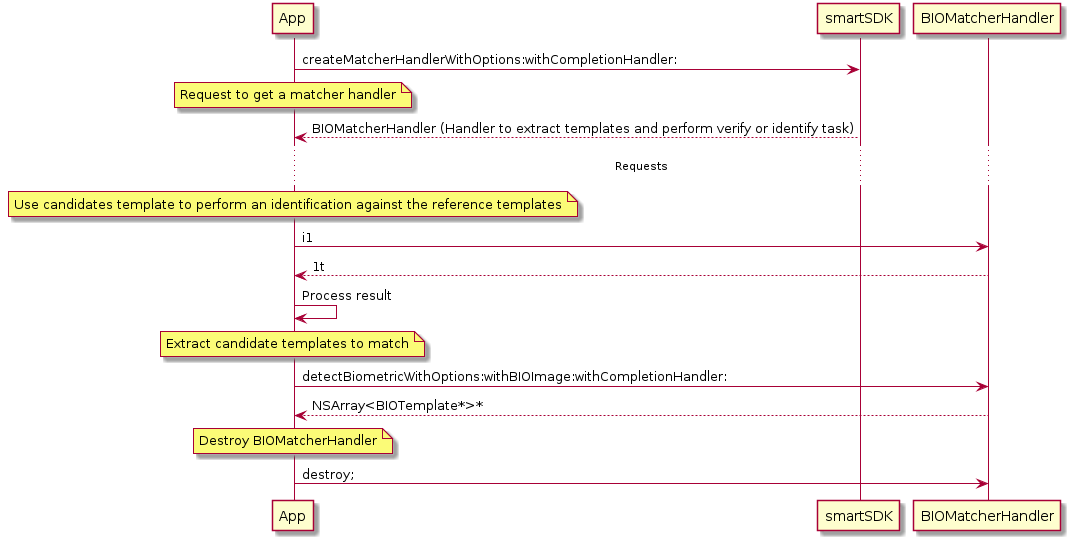
Authentication
This verifies a list of candidate templates against a list of reference templates. Check the use case named Verify.
Objective-C1BIOAuthenticationOptions* options = [[BIOAuthenticationOptions alloc] initWithModality:BIOModalityFace];2 [self.matcherHandler authenticateWithOptions:options3 withBiometricCandidate:biometricCandidate4 withBiometricReference:biometricReference5 andCompletionHandler:^(BIOAuthenticationResult* result, NSError* error) {6 ...7 ` }];
Identify
This identifies the list of candidate templates, to which the user belongs, against a list of reference templates. This method can also be used to verify or authenticate users.
Objective-C1BIOIdentificationOptions* options = [[BIOIdentificationOptions alloc] initWithModality:BIOModalityFace];2 [matcher identifyWithOptions:options3 withBiometricCandidate:biometricCandidate4 withBiometricReferences:biometricReferences5 andCompletionHandler:(^(BIOIdentificationResult* result, NSError* error){6 .......7 }];
Detect Biometric
This function detects the biometrics in a BIOImage. It is intended as an extractor of all the biometric templates contained in an image (for example all the faces that are in an image).
Objective-C1BIODetectBiometricOptions* options = [BIODetectBiometricOptions biometricsWithLocation:BIOLocationFaceFrontal2 withModality:BIOModalityFace];3 [matcher detectBiometricWithOptions:options4 withBIOImage:image5 withCompletionHandler:**void**(^)(NSArray<BIOTemplate*>* templates,6 NSError* error){7 .....8 }];
Bio Store DB

List All Templates
This lists all the templates stored in the database.
Objective-C1+(**void**)listTemplatesWithCompletionHandler:(**void**(^)(NSArray<BIOTemplate*>* templates, NSError* error))completionHandler
Finger Sample App description
The Finger Sample App was created to demonstrate the features of the Capture SDK specifically related to fingerprint biometric capture. It showcases the capabilities of the SDK in handling fingerprint recognition, providing a practical example of how to integrate fingerprint scanning into an application.
Prerequisites
To build and test this sample application you will need:
- Xcode 26 or later (Swift 5 compatible).
- Device with iOS 15.0 or later (simulator is not supported).
- License data (contact us to get the license). You need profileID and API key.
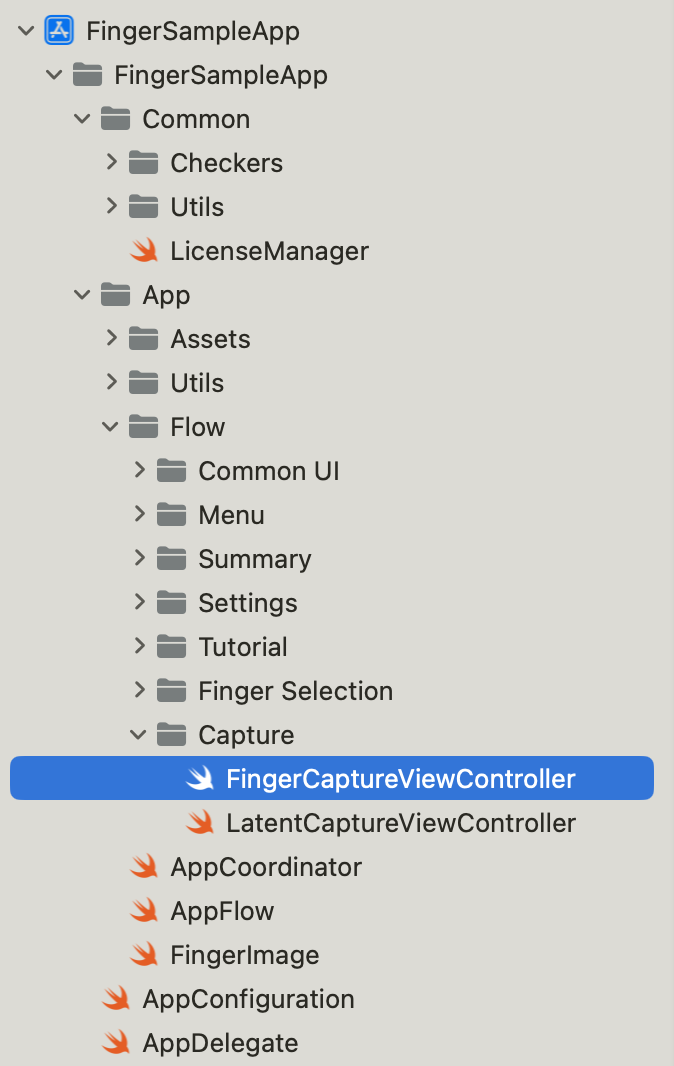
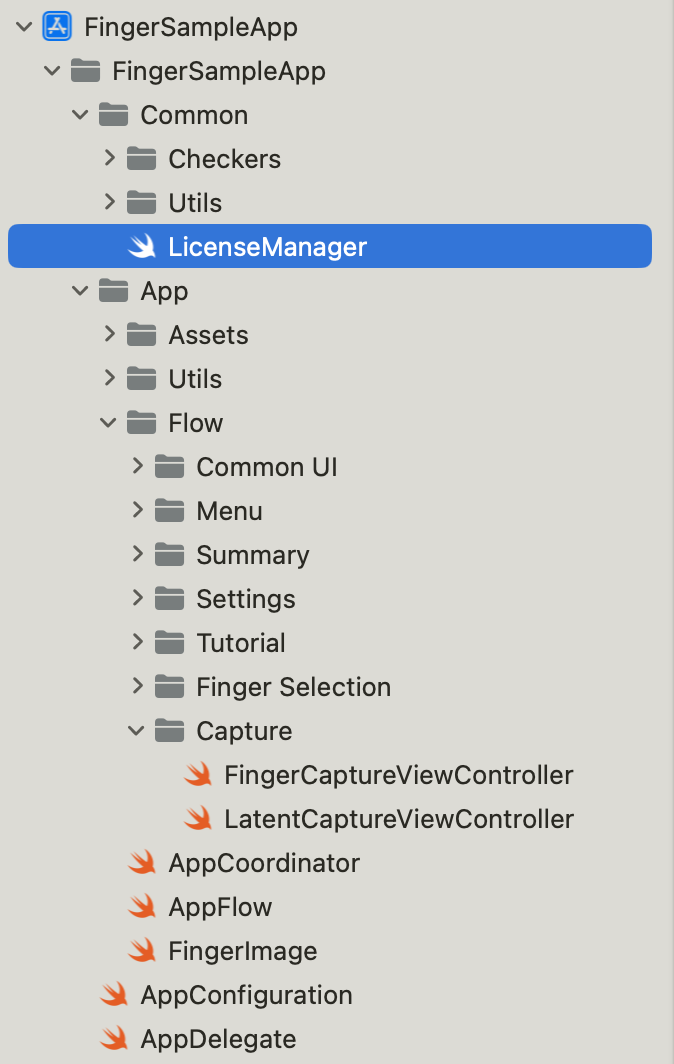
Sample directory structure
The Finger Sample App follows a specific directory structure that organizes its components effectively. Below is a detailed explanation of the structure:
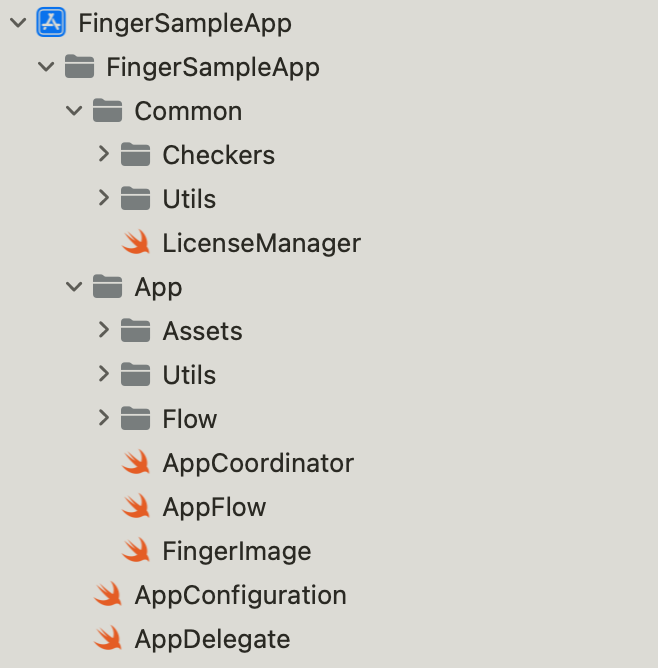
The App Directory
The App directory contains the main application files, which include an example implementation of the Finger variant of the BiometricSDK. The implementation within this directory is structured to showcase a practical use case of biometric recognition using fingerprint technology, offering a reference point for developers looking to integrate or extend the functionality in their own projects.
The Common Directory
The Common directory holds various helper classes that provide utility functions necessary for the operation of the sample app. These classes include the implementation of the LicenseManager, which is responsible for managing licensing operations for the BiometricSDK.
Important files
- The
AppConfigurationfile stores essential credentials used for license activation. - The
FingerCaptureViewControllerfile has usage of theFingerCaptureHandler. This file demonstrates the process of performing finger scanning, providing developers with a clear guide on how to integrate fingerprint capture into their application. It explains how to use finger and amputee scanning. - The
LicenseManagerfile contains an example implementation for handling license activation.
Building the application
- Open project workspace in Xcode.
- Open
AppConfigurationfile and fill in license fields in LKMS struct with values provided by Idemia:
All variables areLanguage not specified1enum LKMS {2 static let serverEndpointUrl = <The License server endpoint>3 static let profileID = <profileID>4 static let apiKey = <apiKey>5}Stringtype. - Open project settings and select application build target. Make sure that General tab is selected.
- In Identity section make sure that Bundle Identifier (PRODUCT_BUNDLE_IDENTIFIER) is set to the APP_ID that you provided to us to generate your license.
- In Signing section make sure that your Team (DEVELOPER_TEAM) is selected.
- Build and run the project.
Glossary of Terms
Term | Definition |
|---|---|
| API | Application Programming Interface |
| CocoaPods | Application level dependency manager |
| iOS | iPhone Operating System |
| ISO | International Organization for Standardization |
| MRZ | Machine Readable Zone |
| OCR | Optical Character Recognition |
| QR Code | Quick Response Code |
| SDK | Software Development Kit |
| Biometric Capture SDK | Toolkit for capturing biometric data |
| Document Capture SDK | Toolkit for capturing data from documents |
| UIImageView | An object that displays a single image or a sequence of animated images in your interface. |